WORTLEY TOP FORGE MODEL ENGINEERS
CONSTRUCTION The 2-BIL is, as mentioned, earlier a two-coach multiple unit. Each coach is almost identical with the exception of the guards compartment in one, the Motor Brake Second. The description of the construction which follows is therefore the same for each of the two coaches.
MAIN BODY MATERIALS As the floor would have to take screws through the edge and end grain, it was decided that "proper" wood had to be used to provide battens to which sides, ends, floor and compartment walls would be secured by waterproof PVA glue and screws. Sides, ends, floor, and internal partitions would be made from 6mm marine plywood. This was chosen as being most suitable for applications where the worst of Yorkshire's weather would be experienced Even if the train was stored in enclosed carriage sheds, temperature extremes and dampness might wreak havoc with any lesser form of ply. In the end, two 8’x4’ sheets were used.
TOOLS The “cheap” approach to the project soon turned out to be an expensive shopping list of new tools. These included new electric drill, (the old one had just burned out anyway), an electric jigsaw, a pillar drill and a number of lesser items! Looking on the bright side, they all stood up to the abuse I gave them and they are now waiting for the next project, so they can be seen as ‘something of an investment’ - or that’s what I told the wife!
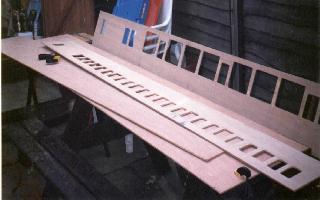
THE FLOOR The floor was cut to size from the marine ply sheet,
not forgetting that the outer ends need to reflect the slightly strange shape
of the front of each coach. The positions were carefully marked out for the
corridor wall and the compartment partitions. A sub-floor framework of
2”x1” timber was glued and screwed in place to give stability and
help prevent any tendency in the floor itself to warp. The 2”x1” also
provides a substantial surface to screw the sides and ends to later on. The
position for the bogie pivot pins was measured and drilled through.
THE SIDES Two long sections of the ply were cut slightly oversize and the sides marked out. All windows were marked out with square corners at first, and then carefully drilled to give the approximate radius of the curved corners where appropriate. The electric jig-saw was then used to cut out all window openings. The driver’s door was recessed for its full height and I achieved this by carefully removing a couple of layers of ply followed by long periods of filling and sanding until a smooth finish was obtained. I’m sure that there is an easier way for this, and I’ll probably try making recessed doors in future as separate items. Doors were marked out and then heavily scribed with a Stanley knife, (using a new blade), to give the effect of opening. It is important not to overdo this or the ply will weaken and, if stressed, a nasty crack will be heard! I know...... I heard it! A couple of backing strips of ply and a liberal coating of PVA fixed the weakness, but I wouldn’t rely on this approach for too many cracked doors!
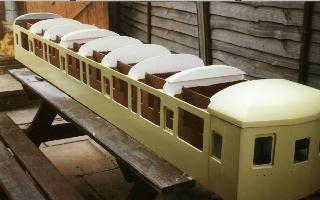 Once everything looked right, which took plenty of
tidying up with files, glasspaper and the odd patch of woodfiller, the sides
were sanded to the exact size required. The sides looked OK - but still a bit
too plain. Despite the risk from the legs of clumsy passengers, I decided that
proper door handles and grabrails would be needed to give the right effect. So
the positions of door handles, grabrails and handrail knobs for the
driver’s doors were carefully marked out and drilled through. A couple of
coats of wood primer were applied before the sides were put away for
safekeeping. Windows were made from acrylic sheet and each pane cut roughly to
size before being slid into plywood slots. I resisted the temptation to glue,
just in case replacements were needed in the future.
Once everything looked right, which took plenty of
tidying up with files, glasspaper and the odd patch of woodfiller, the sides
were sanded to the exact size required. The sides looked OK - but still a bit
too plain. Despite the risk from the legs of clumsy passengers, I decided that
proper door handles and grabrails would be needed to give the right effect. So
the positions of door handles, grabrails and handrail knobs for the
driver’s doors were carefully marked out and drilled through. A couple of
coats of wood primer were applied before the sides were put away for
safekeeping. Windows were made from acrylic sheet and each pane cut roughly to
size before being slid into plywood slots. I resisted the temptation to glue,
just in case replacements were needed in the future.
THE ENDS The two 'conventional' coach ends were made
from the marine ply, with steps and waterpipes fashioned from scrap aluminium
and brass wire. The typical EMU fronts were made from three sections of ply
joined together with plenty of body-filler to arrive at the strange profile
required. 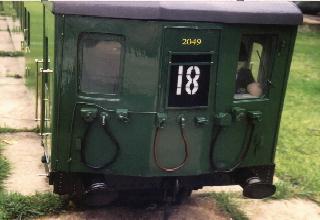 All kinds
of wood and wire scraps were used to give the array of control boxes and jumper
cables. Screw couplings (non-functional) were purchased and added to the buffer
beams which were made from steel plate. These were also drilled with numerous
holes and rivets inserted for effect. The unusual but characteristic route
indicator stencils were cut from steel by a friend who runs a spark and wire
erosion business. These drop into an illuminated frame and can thus be placed
at either end of the unit depending on its direction of travel...... just like
the real thing! A driver was added at one end just to keep the grandson quiet
.... even if he hasn't yet spotted that it was 'stolen' from his own
toybox!
All kinds
of wood and wire scraps were used to give the array of control boxes and jumper
cables. Screw couplings (non-functional) were purchased and added to the buffer
beams which were made from steel plate. These were also drilled with numerous
holes and rivets inserted for effect. The unusual but characteristic route
indicator stencils were cut from steel by a friend who runs a spark and wire
erosion business. These drop into an illuminated frame and can thus be placed
at either end of the unit depending on its direction of travel...... just like
the real thing! A driver was added at one end just to keep the grandson quiet
.... even if he hasn't yet spotted that it was 'stolen' from his own
toybox!
THE ROOF The roof for each coach was fabricated from fibre-glass. A fellow member at the Wortley Top Forge Model Engineers volunteered to supply these, in any length sections required, and his own 1/8th scale 57' LMS Stanier coaches bore suitable testimony of the look and strength of this form of roofing, and the profile of the LMS roof compared to the Southern was not too dissimilar to the untrained eye to give any real cause for concern. The prospect of trying to build a properly shaped roof any other way did not bear thinking about! As for the roof detail, this was sacrificed due to both the fragility of the ventilators, periscopes, conduit etc., and the comfort factor when passengers would be seated upon them! As mentioned previously, the control panel was to be mounted in the roof in a cut-away section at the front end of the leading coach. The characteristic, (unique?), SR EMU domed roof ends over the driving compartments were shaped and carved using five offcuts of the mouldings and plenty of car-body filler. Because of the amount of interior detail, and the plan to use the inside of the motor brake second for the traction and power equipment, the roof needed to be detachable. Suitable holes were therefore drilled into the roof and steel brackets mounted on the bulkheads with nuts welded on to accept countersunk coach bolts.