The Floor
12mm thick MDF was used for the floor which was fully marked out for all
the strengthening bulkheads before cutting. Care was needed to ensure that the
correct variable width was achieved to match the different body widths along
the length of the loco. Slots for the location of the bulkheads were then
routed out.
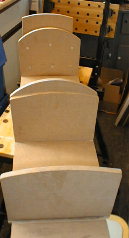
Body Sides and Bulkheads
 12mm MDF was selected for the bulkheads, which were cut to size and
to the odd shapes necessary for the two distinct roof profiles - a strange
appearance when viewed in isolation as the picture shows!
12mm MDF was selected for the bulkheads, which were cut to size and
to the odd shapes necessary for the two distinct roof profiles - a strange
appearance when viewed in isolation as the picture shows!
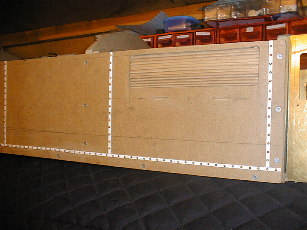
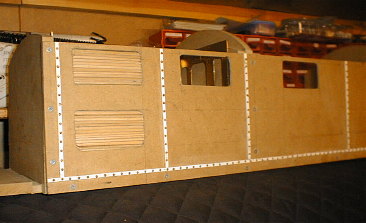
 6mm
MDF was selected for the sides. These were marked out and cut to shape and size
before the openings for the windows and louvres were cut out. For the windows,
to reduce the overscale thickness of the MDF, the openings were then reduced by
three millimetres on the milling machine to allow a recess into which perspex
would later be dropped. 2mm ply was glued behind the louvre openings before
strips of the same material were cut and glued at around 45° to produce the
louvre effect far from perfect, but the effect seems to look about right. To
simulate the body joints, (rivetted steel bands on the prototype), 4mm wide
strips of plasticard were glued on in the appropriate locations (using Evostik)
before shallow holes were drilled and more of those numerous copper rivets
glued in place.
6mm
MDF was selected for the sides. These were marked out and cut to shape and size
before the openings for the windows and louvres were cut out. For the windows,
to reduce the overscale thickness of the MDF, the openings were then reduced by
three millimetres on the milling machine to allow a recess into which perspex
would later be dropped. 2mm ply was glued behind the louvre openings before
strips of the same material were cut and glued at around 45° to produce the
louvre effect far from perfect, but the effect seems to look about right. To
simulate the body joints, (rivetted steel bands on the prototype), 4mm wide
strips of plasticard were glued on in the appropriate locations (using Evostik)
before shallow holes were drilled and more of those numerous copper rivets
glued in place.
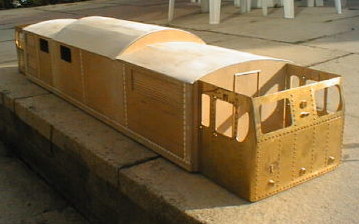
The Roof
Even a quick glance at the roof line of the EM1 shows two very different
profiles and so it was decided to build the roof in separate sections. The
central section was tackled first. Two pieces of 6mm MDF were cut to size, one
to fit snuggly inside the top of the bodysides, the other to sit on top of
them. This gave the 'plug-in' base of the roof section. Formers cut to the
correct profile were then made from 12mm MDF and glued and screwed in place on
the base. 2mm ply was then cut to the rough size of the roof itself and then
scribed before bending to shape and glueing and pinning on to the formers.
Whilst this gave the correct profile, the scribing lines on the reverse have a
tendency to show through as if there are longtitudinal roof struts! This is
less obvious once the roof has received its grey paint! The two outer sections
of the main roof were constructed in the same fashion. For the cab roofs,
pieces of 6mm and 12mm MDF were glued together to form another plug-in section,
and then the profiles marked. They were then formed out of the solid a
combination of planes, sandpaper and sanding discs, plus profuse amounts of car
body filler! Small brass lifting lugs were bent to shape and drilled before
fixing with screws to the roof sections, and long lengths of plastic rod glued
in place to represent the main electrical conduits along one side of the roof
section.